
Free In-Home QuoteBook Now

Houston Cool Pools

Pool Construction Sequence

Excavation & Re-Bar

A step-by-step walkthrough of how Houston Cool Pools builds your custom backyard pool - from the first stake in the ground to the first splash.

Step 2 of 6Excavation & Re-Bar
1

Excavation

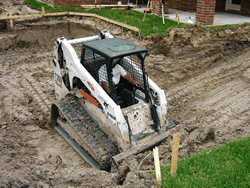
Bobcat tractor excavating the pool cavity to the staked-out shape

Within the staked-out area, excavation begins by use of a bobcat tractor, cutting a precise shape and curvature. The actual hole will be 6″ to 9″ larger than the finished dimensions of the pool in all directions to allow forming material to be placed around the outer edge of the pool and/or spa.

Keep in mind, the bond beam is a 12″ x 12″ dimension around the top circumference of your pool. Excess dirt and soil are removed on the same day of excavation. If you want any dirt left on site, arrange with us in advance where it should be dumped and how much BEFORE excavation.
2

Re-Bar

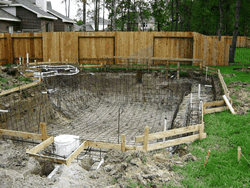
Grid of steel reinforcement bar tied on 8-inch centers throughout the pool shell

Reinforcement bar (Re-Bar - 3/8″ diameter steel) is tied to form a mesh framework on the floor and walls of your pool on 8″ centers throughout. Re-Bar runs the bottom of the pool, up the sides around the skimmer, and into the bond beam (also called the box beam). For added strength, the bond beam uses larger 1/2″ diameter Re-Bar.

Spacers ensure the Re-Bar is suspended above the ground and off the dirt walls. This allows gunite to flow evenly under, around, and above the bars. Although weak in appearance on its own, Re-Bar becomes the structural strength of your pool once combined with gunite. Small tie wire merely holds the bars in place until the gunite is applied.

Ready to start your build?

Talk to Houston Cool Pools about your custom backyard project. We'll walk you through every step of the construction sequence.

Houston Cool Pools

“Building our reputation one pool at a time.”

Serving Houston since 1996 · (281) 645-6631